Our Top 2 Tips for Landscape Painting

Landscape painting is a beautiful type of art. Many artists that see a magnificent view understandably want to get it down on their canvas. However, landscape painting can be more difficult than it seems. Here, we provide our top 3 tips to help you with landscape painting:

Keep it simple

Many beginner artists get lost in the tiny details of a landscape. While details are certainly important, try not to get lost in them. It is much better to emphasize particular areas of your painting instead of getting every little detail right. You can then leave the rest to the imagination of the viewer.

Embrace imperfection

Nothing is perfect. Learning to embrace imperfections can make you less self-critical, which in turn can make you a better artist. This is especially true for landscape paintings. Many beginners want to paint a scene exactly as they see it. When they can’t replicate it exactly, they quickly discouraged. However, there’s nothing wrong with some creative license. Your landscape painting does not have to match the landscape you see exactly. Learn to be ok with imperfections in your work—after all, you’re only human.

Creative Ventures Gallery offers a wide variety of classes and workshops that can help hone your skills as a landscape artist. Contact us today to learn more!

Shape vs. Form

As you learn to draw or paint, you will soon be introduced to many concepts. One of these concepts is understanding the difference between shape and form. Most beginner artists assume they are the same thing, and while they are related, they are nevertheless different. Here, we discuss the differences between shape and form to help you better understand their distinct characteristics.

Shapesoccer ball sketch

When someone describes the shape of an object, they will use words like “circular”, “rectangular”, “triangular”, and the like. What do circles, rectangles, and triangles all have in common? They are all two-dimensional (flat) objects.  They have a length and width, but no height, and are typically simple figures.

Form

Most objects in the real world are three-dimensional, not two-dimensional. These three-dimensional figures are what we mean when we describe form, and they include objects such as spheres, cubes, and cones. Since they are three-dimensional, they have a length, width, and height.

However, we can only draw in two-dimensional figures. So, how do you create form in artwork? You do so by creating the illusion of three dimensions. This is accomplished through shading and the cast shadow. When you draw a circle, you have drawn a shape. But when you want that circle to have form, you shade it to create the illusion that it is a three-dimensional object.

Now that you understand the differences between shape and form, it’s time for you to start tackling more challenging art projects. At Creative Venture Art Gallery, we offer art classes and workshops for people of all levels. Contact us today to sign up!

What Is Foreshortening?

As you begin your artistic career, there will be many methods and techniques you will have to master. One of those techniques is foreshortening. Foreshortening is something you will use in every artistic piece, from simple drawings to watercolor paintings. Here, we discuss everything you need to know about foreshortening.

What is foreshortening?

Foreshortening is an artistic technique used for perspective. It creates the illusion that an object is receding into the distance by making an object shorter than it is in reality.

Think of it this way: when you extend your arm straight out in front of you, you will notice that your arm looks shorter than it is when you hold it horizontal to your chest. Your arm didn’t actually grow shorter, it just appears that way because it’s extending further away from your field of vision.

We do the same thing with objects in our painting. We make them appear shorter so it seems like they’re extending back towards the background of your painting. This is how we give perspective and dimension to 2D objects.

How do you use foreshortening?

In order to use foreshortening, you will use perspective lines. These are lines that extend from a single point on the horizon line, called the vanishing point. Perspective lines will help you determine the size of your object as it recedes from you into the background. Once again, the further your object recedes into the distance, the shorter and smaller it will become.

Foreshortening can be a tricky concept to master. It can help to have someone by your side, guiding you through the steps. That’s why Creative Ventures Gallery offers a wide variety of classes and workshops to help you better understand and utilize foreshortening. Contact us today to sign up!

How to Critique Your Own Artwork

Every artist is their own worst critic. However, we can also be blind to our own faults. Critiquing our own artwork is difficult due to our own inherent biases and judgments. But it’s not impossible. Learning how to look at your work critically but compassionately can help you grow as an artist. Here’s how to get started:

Be Objectivewoman painting artwork on a canvas

Objectivity is crucial when critiquing anything. When it comes to our own artwork, we have the tendency to either be too harsh to too easy on ourselves. Instead, take a step back and view your piece how an outsider would view it. Don’t ignore your mistakes, but don’t overinflate them either. It can help, too, to step away from your painting for some time and then come back to it with fresh eyes.

To be clear, there is no sure-fire way of doing this. Objectivity is something that every single person struggles with. But so long as you try to be objective, then you will start seeing your artwork in a more balanced way.

Look at the Big Picture

As you study your artwork objectively, you’ll start to notice areas for improvement. Don’t focus on tiny mistakes, but instead look at the big picture. For example, it does no good to fixate on one tiny error. Even the best painters make these mistakes. But if you step back and notice that you struggle with perspective or that some of the colors look out of place, then you can make a plan to improve these skills.

Find Areas of Greatness

We have a tendency to focus on the negative instead of the positive. While finding mistakes can help us grow as an artist, it’s important we don’t go too far. If you only focus on the negative, you’ll quickly become discouraged. So, after you’ve found your areas of improvement, look for areas of greatness. In other words, find parts of your painting that you did well on and are proud of. Give yourself a pat on the back and remind yourself how hard it is to accomplish this task.

Creative Ventures Gallery can help you improve your artistic skills, no matter your skill level. Look through our available classes and workshops or contact us today to learn more!

How to Price Your Artwork

When you finish a piece of artwork, you may be tempted to sell it. Doing so will not only put a little extra money in your pocket, but it will also share your artwork with the world. But, how exactly do you price your artwork? What will seem reasonable to the buyer while also providing you with the money you deserve for all your hard work? Read on to learn more:

Factor in the cost of materials

Every type of artwork will require tools, paint, and other materials. When figuring out the price of your artwork, you should consider how much money you spent to make that artwork a reality. Your artwork should allow you to break-even or even earn a profit.

Look at what other artists are selling for

Take a look around the local market. What are other artists selling their artwork for? You should look at similar pieces of artwork and artists with a similar reputation as yours to get a better idea for what you should price yours at.

Consider your reputation

Is this the first painting you’re selling? Are you just starting to get into the world of art? If so, then you likely don’t have the same reputation as artists that have been selling their work for years. Well-known, local artists can sell their work at a higher price because they have a bigger reputation. However, if you’re just starting out, you may want to be conservative with your prices as customers will not be as willing to shell out cash.

For more tips and tricks, be sure to read through our blog or sign up for one of our classes and workshops!

The Different Types of Color Contrast

Color contrast is an essential tool when painting. It creates a striking image on the canvas, delineating between two distinct elements. With proper use, you can use color contrast to focus attention on a key element or feature stunning colors.

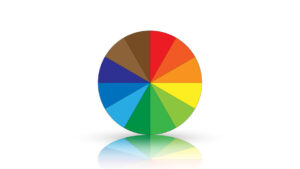
However, color contrast is more complicated than simply placing two contrasting colors next to one another. There are actually three different types of color contrast. Learn more below:color wheel vector illustration

Value Contrast

Value is how light or dark an element is on a scale of white to black. Value contrast, then, refers to the contrast between light and dark colors. For example, yellow is lighter on the value scale than green. So, if you placed yellow and green next to one another, there would be a value contrast.

Hue Contrast

Hue contrast is what most people think of when they imagine contrast. It refers to the contrast between different colors on the color wheel. Complementary colors (colors on opposing sides of the color wheel) have strong contrast. So, for example, yellow and blue are on opposite ends of the color wheel. As such, they have strong hue contrast.

Saturation Contrast

Finally, there’s saturation contrast. This type refers to contrast between saturated and dull colors. For instance, there will be a sharp saturation contrast between a saturated orange and a dull orange. They may be the same hue, but their saturation differs significantly.

Understanding the different types of color contrast can help you on your journey of becoming a great artist. At Creative Ventures Gallery, we also have plenty of classes and workshops to further you along on this journey. Contact us today to learn more!

How to Name Your Painting

Every great piece of artwork has a name, so it’s only right that you name your own pieces as well! However, this can be a daunting task for some artists. After all, how do you name something you’ve poured your heart and soul into? It needs to be perfect to reflect the work you’ve put in and the story you want to tell.

To help you out, we’ve listed a few tips on how you can name your painting.Landscape with houses, watercolor illustration

Keep it simple

When it comes to naming a painting, simple is always best. Most pieces of artwork use titles with just a couple of words at most. If you make your name too long or convoluted, people and admirers won’t be able to remember its name. A simple name, meanwhile, will be memorable and easy to remember.

Make it descriptive

Your painting’s name should reflect what is happening in the painting. It can center on the subject, scene, or story you want to tell. For example, Lilla Cabot Perry’s Lady With a Bowl of Violets shows just that, a lady with a bowl of violets. However, if you want to be more creative, you can. Frederick McCubbin’s Down on His Luck shows a forlorn man sitting alone in the woods. The title describes the story that is being told rather than just the subject’s appearance.

You can describe a wide variety of features in your painting. Here are some to get you started:

  • Emotions, feelings, or ideas
  • The subject of the painting
  • The scenery or environmental conditions of the painting
  • The story playing out
  • Artistic elements
  • A statement about society, politics, etc.
  • Symbolism

Remember, you don’t need a fancy name for your painting. Just pick something that reflects its true nature.

For more painting tips, be sure to read through our blog or sign up for one of our classes and workshops!

The Different Types of Artist Palettes

An artist palette is a handy tool for any painter to have. While we mostly think of the old, wooden palettes, there are actually several varieties out on the market. Here, we discuss the different types of artist palettes so you can choose the right one.

Traditional woodWooden art palette with blobs of paint

If it ain’t broke, don’t fix it. Traditional wooden artist palettes have been used for centuries, and for good reason! Simple to use and easy to wash, they allow you to easily mix colors. So long as you don’t mind holding your palette as you paint, you can’t go wrong with this type of palette.

Disposable

Typically made out of paper, disposable palettes are a one-and-done type of palette. This makes it very easy to clean up, but it does mean you’ll have to continually replace your palettes over time. Additionally, disposable palettes are not completely flat, which could be an issue if you’re using a palette knife.

Glass

Glass palettes are becoming an increasingly popular option amongst artists. They’re remarkably easy to clean—all you need is a razor to scrape the paint away. However, these palettes will break if you drop them, so be careful with them.

Stay wet

These types of palettes are best used for acrylic painting, as they help keep your paint wetter for longer. However, we don’t recommend them for oil painting.

Plastic

Plastic palettes can be flimsy, but they’re extremely affordable. As such, they may be a good option for beginners who may not want to spend too much money yet.

At Creative Ventures Gallery, we offer a wide variety of painting classes that can help you take your artistic skills to the next level. Contact us today to learn more.

The Pros and Cons of Selling Prints of Your Artwork

No one can replicate the feeling of having an original piece of artwork. However, not all of us are fortunate enough to have original artwork, especially if the one piece we love is not available for sale. As an artist, you may have come across customers asking for prints of your artwork. You’ve debated the value of prints, but still aren’t sure if it’s worth it. That’s why we put together a list of pros and cons for selling prints of your artwork.

Pros of Selling Printscollection of art prints on wall

  • Prints allow your fans and customers to purchase a copy of their favorite artwork at a more affordable price.
  • They are flexible and versatile. You can make them in a variety of types, materials, and sizes depending on your customers’ wants and needs.
  • Prints are scalable, meaning the more you sell the more profitable prints become. You can also control how many you sell. Meanwhile, an original artwork can only be sold once.
  • They can help you earn money without taking up much time.

Cons of Selling Prints

  • Prints can diminish the value of your original works.
  • Prints won’t earn you much if you only produce a few—they must be sold at higher volumes in order to make a profit.
  • The up-front costs of getting all the equipment can be too high for some artists.
  • Invariably you might pick the wrong paintings to make prints of. As a result, you’ve spent money on something that won’t sell.

Whether or not you plan to sell prints, Creative Ventures Gallery can help you take the next steps in your artistic journey. Look through our list of classes & workshops to get started!

How to Paint Color Gradations

Color gradation is how you transition from one color to the next. Your painting is filled with color gradations. Some are sharp, with clear boundaries that delineate one object from another. Others, however, are smooth and subtle, building the color change gradually instead of all at once.

The nature of your color gradations will depend on what you’re trying to convey. As such, there are various techniques you can use when using color gradation in your painting. These include the following:

Blendingcolor gradation on blue sky

The easiest way to use color gradations in your painting is to blend one color into the next. This is typically used to develop smooth color transitions like you would see in a morning sky.

Intermediate Color

Another way to perform color gradations is to place an intermediate color in between the two colors you’re transitioning to and from. For example, if you want to transition from blue to yellow, you can place a bit of green in between to help smooth out the transition.

Broken Color

The broken color technique is most frequently used by Impressionist painters. For example, if you wanted to paint a lake, most techniques would have you use smooth blue tones with gradual transitions. However, with the broken color technique, you would paint with small dabs of different colors, such as blues, whites, greens, grays, etc.

Hatching

Hatching is most often used in drawings rather than paintings. You draw parallel lines to darken an area. The closer together the lines are, the darker the area appears, and vice versa.

Layering

Layering is as it sounds. You place thin layers of paint on top of one another to create color gradations. The layers should be partially translucent.

Density

Color gradations can also be created by varying the density of each color you use. You can do this by controlling the number of strokes, the amount of pressure, or the thickness of the paint for each color.

At Creative Ventures Gallery, we offer beginner paint classes that will help you better understand the concept of color gradation. To learn more, look through our selection of classes today!